by Santosh | Jun 24, 2020 | Soccer, Sports
LEARNING OUTCOME
To improve Goalkeeping techniques
TEACHING CUES
- Keeper to be on toes all the time
- Anticipation & awareness
- Footwork – agility & flexibility
- Stance – bend the knees to lower the body, head and shoulders up straight. as the ball arrives, the keeper should surround it with his arms, elbows close together to trap it against the chest
ACTIVITY SET-UP AND PROCEDURE
EQUIPMENT:
Marked area and balls
SET-UP:

ACTIVITY PROCEDURES:
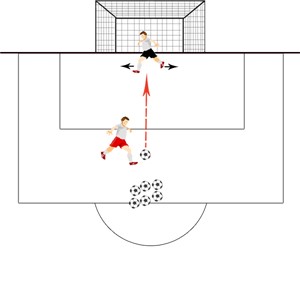
- Play is set up using one goal, one GK, one server, 10 balls.
- The aim of the drill is for the server to half volley shots straight at the keeper’s chest.
- The chest catch is needed when the shot is right at the keeper, as the ball arrives, the keeper should surround it with his arms, elbows close together to trap it against the chest.
Progressions:
- Increase / decrease tempo of shots
- Increase the distance between servers and GK.
COOL DOWN/ CLOSURE
Review Skill/Activity, stretching, and questions.
by Neetu | Jun 24, 2020 | Sports
Aim
- Move the ball while moving forward without losing the contact with the stick – keeping under control
- Follow directions by keeping control of equipment and body in order to keep safe and active.
Equipment Required
1 Hockey Stick, 1 ball per student, saucer cones, 4 Large cones for boundary
Play Area Set-Up
- Create boundaries for a large activity area with large cones.
- Line up cones to mark the starting point and endpoint of the dribble. Each student to line up behind the cone.
- Make lanes according to the number of students to allow Dribble with the ball in a straight line for 10m.
Activity Description
Grip & Stance
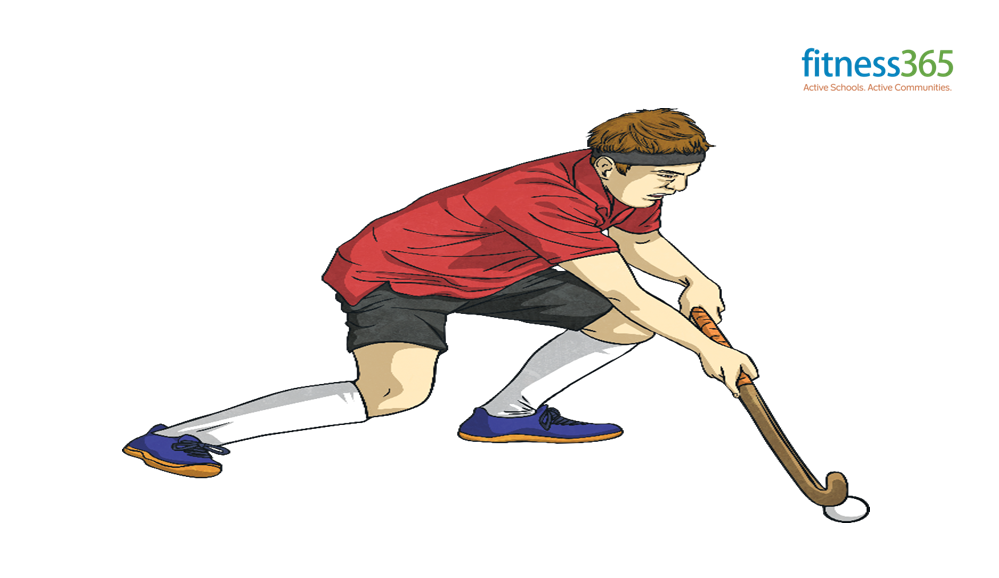
- Use basic grip
- The left-hand grip the stick at the top of the handle and turns it
- The right hand has a loose grip and allows the stick to be turned but also steers the direction of the stick
- Body position is low (knees bent leaning forward) with the arms extended in front of the body
- The stick is positioned with left hand close to the body and right hand out in front – comfortable stance
- The ball is in front of the body (approximately 1 stick length from the player’s ankle)
Movement:
- Move the ball from right to left – left to right across the body and roll the stick over the ball – no daylight between stick and ball
- Increase the distance of the Indian dribble – start ball, stick, and wrists outside the right side of the body and drag to outside their left
- Keep the ball in front of the body and look up during dribbling (vision)
- Transferring your weight to increase the length of the drag
- Push off on your right foot with the ball on forehand side – Push off a left foot with the ball on the reverse stick side
- Stick and ball on the right side – look at the time on your watch
TEACHING POINTS FOR INDIAN DRIBBLING
- Keep the ball close to your stick
- Carry the ball out in front & to the side of the right foot
- Bend at the knees–straight back–chin up
- Learn to look up while moving so that you can see what is happening around you and you won’t collide with anyone else
- Roll stick over the front of the ball to stop the ball moving forward & protect
- The only flat side of the stick can touch the ball
GAME: Red Light Green Light (with INDIAN DRIBBLE)
- It’s time to play Red Light, Green Light while we dribble our footballs. Cars use gasoline as fuel and some use electricity. Our bodies use Calories for fuel and we get Calories from food. When we’re physically active, we burn calories. It’s important that we eat healthy food in order to refuel our bodies. Who can give me some examples of healthy foods?
- Your goal is to dribble your football over the end line where I’m standing. I will be the traffic light first
- When I call out “Green Light,” you will start to dribble toward the other end line. When I call out “Red Light,” you have to stop and freeze immediately, keeping control of your football
- Any student who doesn’t stop on time must go back to the start.
- When you cross the end line that I’m standing on, you score a point and we’ll restart the game
by Neetu | Jun 24, 2020 | Sports
Aim
- Move the ball while moving forward without losing the contact with the stick – keeping under control
- Follow directions by keeping control of equipment and body in order to keep safe and active.
Equipment Required
1 Hockey Stick, 1 ball per student, saucer cones, 4 Large cones for boundary
Play Area Set-Up
- Create boundaries for a large activity area with large cones.
- Line up cones to mark the starting point and endpoint of a dribble. Each student to line up behind the cone.
- Make lanes according to the number of students to allow Dribble with the ball in a straight line for 10m.
Activity Description
Grip & Stance
- Use basic grip
- The left-hand grip the stick at the top of the handle and turns it
- The right hand has a loose grip and allows the stick to be turned but also steers the direction of the stick
- Body position is low (knees bent leaning forward) with the arms extended in front of the body
- The stick is positioned with left hand close to the body and right hand out in front – comfortable stance
- The ball is in front of the body (approximately 1 stick length from the player’s ankle)
Movement:
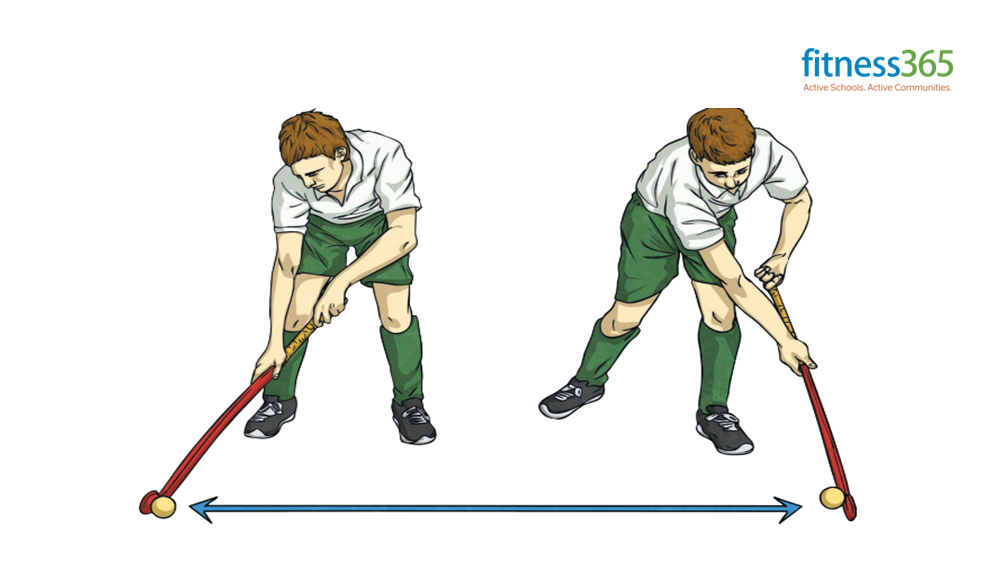
- Move the ball from right to left – left to right across the body and roll the stick over the ball – no daylight between stick and ball
- Increase the distance of the Indian dribble – start ball, stick, and wrists outside the right side of the body and drag to outside their left
- Keep the ball in front of the body and look up during dribbling (vision)
- Transferring your weight to increase the length of the drag
- Push off on your right foot with a ball on forehand side – Push off a left foot with the ball on the reverse stick side
- Stick and ball on the right side – look at the time on your watch
TEACHING POINTS FOR INDIAN DRIBBLING
- Keep the ball close to your stick
- Carry the ball out in front & to the side of the right foot
- Bend at the knees–straight back–chin up
- Learn to look up while moving so that you can see what is happening around you and you won’t collide with anyone else
- Roll stick over the front of the ball to stop the ball moving forward & protect
- The only flat side of the stick can touch the ball
GAME: Red Light Green Light (with INDIAN DRIBBLE)
- It’s time to play Red Light, Green Light while we dribble our footballs. Cars use gasoline as fuel and some use electricity. Our bodies use Calories for fuel and we get Calories from food. When we’re physically active, we burn calories. It’s important that we eat healthy food in order to refuel our bodies. Who can give me some examples of healthy foods?
- Your goal is to dribble your football over the end line where I’m standing. I will be the traffic light first
- When I call out “Green Light,” you will start to dribble toward the other end line. When I call out “Red Light,” you have to stop and freeze immediately, keeping control of your football
- Any student who doesn’t stop on time must go back to the start.
- When you cross the end line that I’m standing on, you score a point and we’ll restart the game
Game : (Driver Test) or Rob the nest
- Four teams – each team behind a colored hoop – place hockey balls in the center of the square
- One player from each team runs out with their hook on the ground to collect one ball and dribbles back home – roll hook over the ball to stop it in their hoop
- Coach to call out the type of dribble to be used
- No hook on the ground or not dribbled back correctly that player will lose a turn
- The next player will run out and perform the same task – Play continues until no more hockey balls available
- Team with the most hockey balls wins
- Variations: 1. 1 player can rob the nest from another team once all hockey balls are out of the middle 2. All players can now rob –
- Question: Who is protecting their nest if all players are robbing their opponent’s nest? Play for one or two minutes extra when robbing the nests
Key points:
- Comfortable grip with hands in the right position.
- The ball is in front of the body and right of the feet
- Roll the hook over the ball to stop it
- Advise the teams to use the correct technique – not to cheat
- Advise the teams that are not winning to rob the nest of the team that is – therefore creating a fun atmosphere
- Teams can have one protector/goalkeeper for their nest
by Santosh | Jun 24, 2020 | Soccer, Sports
LEARNING OUTCOME
To improve Goalkeeping techniques
TEACHING CUES
- Keeper to be on toes all the time
- Communication, keep talking to the defenders and other players around the last 3rd of the pitch (KEEPER’S BALL !!!) Even at training it is good practice to shout loud for the ball
- Anticipation & awareness
- Footwork – agility & flexibility
ACTIVITY SET-UP AND PROCEDURE
EQUIPMENT:
Marked area, cones and balls
SET-UP:

ACTIVITY PROCEDURES:
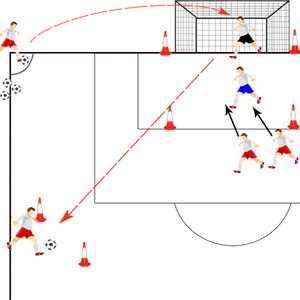
- Play is set up using one goal, one GK, one server, one wide player, one defender, two forwards and 10 balls.
- The aim of the drill is for the server to cross the ball from a wide area or corner in to the cones area around the 6yd box.
- The 2 forwards and the defender are allowed to compete for the ball.
- The emphasis is on the GK’s decision making, anticipating the flight and speed of the ball to come and catch the ball at its highest point.
- If the GK collects the ball they must move towards the edge of the box and throw the ball towards the wide play simulating a fast break attack.
Progressions:
- Alternate sides so crosses come in from both the left and right wide positions.
- Change angles of server
- Wide player can cross balls in to coned area.
- Drive crosses
- Loft crosses
COOL DOWN/ CLOSURE
Review Skill/Activity, stretching, and questions.
by Neetu | Jun 24, 2020 | Sports
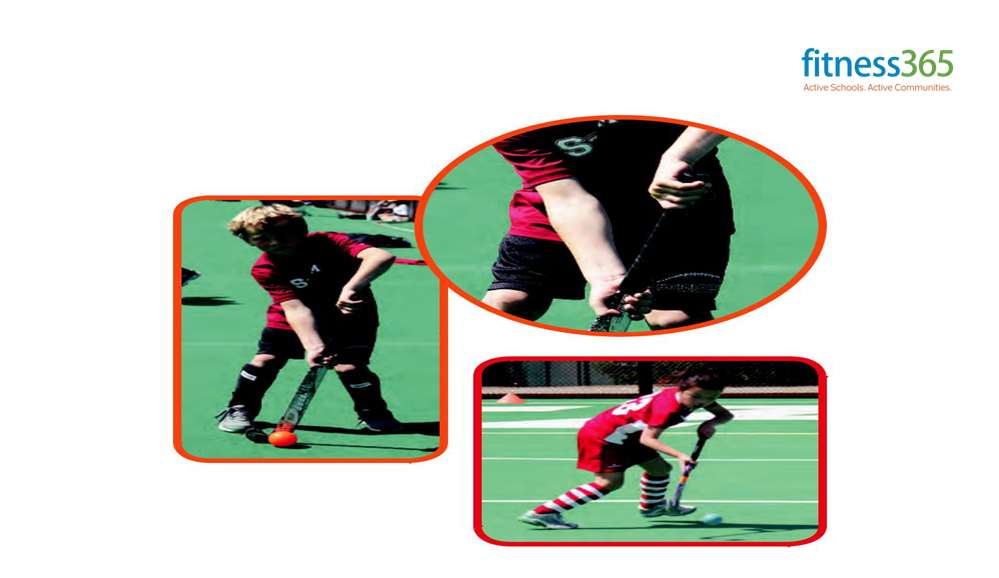
- Use the basic grip
- Body position is low (knees bent leaning forward) with the arms to the right of the body
- The stick is at a right angle of 60˚ to the surface with the face pointing forward
- The ball is to the right of the body and out in front – feet inline
- To push the ball, step forward with your left foot (ball should now be in line with your right shoulder) – (keep feet inline) and push – right arm and stick aims towards the target
- Maintain vision
TIP:
– Push passes are the ideal technique for a short, quick pass
– When push passing on the run, keep your stick close to the ball and push with speed – Ball in front of hands
– Very good for a weighted pass which is to have the ball stop at the desired point, used by midfielder to striker
PUSH PASS
Body Position
- Athletic Stance
- The body position should be side-on, toward the intended target
Hand and Stick Position
- Hands apart
- Hands and stick are away from the body and the toe of the stick should follow through low and towards the target
Stick Position
- Stick on the ball – no backswing
Ball Position
- Ball position in line with the back leg with right arm extended and left elbow bent
Skill Execution
- Stepping action with left foot
- Open left foot toward the target
- Transfer of weight to front leg – Keep your feet moving through the pass AND have your weight moving at the target
- Follow through leading with left elbow
- Push the ball using the flat side of the stick
Skill activity 1: Pairs Push
- Players in pairs, approximately 5m apart
- Player 1push passes the ball to the forestick of player 2
- Player 2 traps the ball and pushes back to player 1
& continue
Skill activity 2: Corner Spry
Player 1 push pass to player 2 – P2 traps and push pass back to P1
P1 push pass to P3 – P3 traps and push pass back to P1
P1 push pass to P4 – P4 traps and push pass back to P1
P1 push pass to P5 – P5 dribbles to the P1 position
P1 runs to P2 position – all players move across one position
by Santosh | Jun 24, 2020 | Soccer, Sports
LEARNING OUTCOME
To improve defensive heading techniques and accuracy
TEACHING CUES
- Timing of the header
- Direction of the header
- Use the forehead, not the top of the head
- Players to jump for the ball to take it earlier
ACTIVITY SET-UP AND PROCEDURE
EQUIPMENT:
Marked area appropriate size for age, 9 cones, 1 ball between 4 players.
SET-UP:

ACTIVITY PROCEDURES:
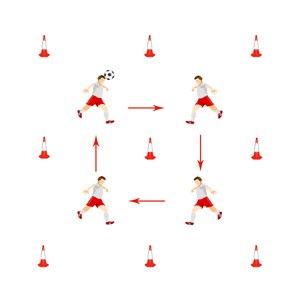
- Players set up in a square.
- One player throws the ball up to the player next to them.
- This player must then head the ball to the player on the other side of them, who catches the ball and the sequence of throw, head, catch is repeated around the square.
- Swap roles of players so everyone gets to head the ball.
Progressions:
- Players should try and head the ball all the way around the square.
- Increase / decrease the distance between players
- Players can move around the box so the header must be directed
- Players can head in any direction to any player
COOL DOWN/ CLOSURE
Review Skill/Activity, stretching, and questions.


