by Santosh | Jun 24, 2020 | Soccer, Sports
LEARNING OUTCOME
To improve control, heading and volleying techniques
TEACHING CUES
- Emphasis is on 1st touch, soft touch, keep ball out of feet and in the direction of supporting player
- Players encouraged to keep the ball in the air which will allow team mate an easier pass to deal with before knocking over the net.
- Communication is essential
ACTIVITY SET-UP AND PROCEDURE
EQUIPMENT:
Marked area appropriate size for age, 8 cones, 1 ball between 4 players
SET-UP:

ACTIVITY PROCEDURES:
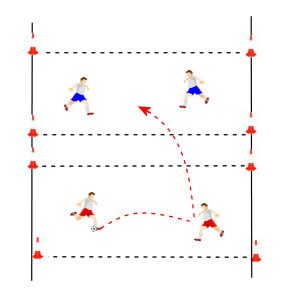
- Using the scoring system from tennis, players pass, volley or head the ball to the opponent’s side of the court / area over the net (or coned area).
- Each team are allowed three touches and 2 bounces before knocking the ball over the net.
Progressions:
- Allow more or less touches and bounces
- Increase / decrease the size of the area
COOL DOWN/ CLOSURE
Review Skill/Activity, stretching, and questions.
by Santosh | Jun 24, 2020 | Soccer, Sports
LEARNING OUTCOME
To improve dribbling
TEACHING CUES
- Emphasis is on keeping the ball close to feet
- Encourage players to use tricks and pieces of skill
- Feints / drop shoulder, nutmegs, knock & run, big toe little toe, etc.
- Encourage players to run at pace, turn quickly, sharp change of direction and close control.
ACTIVITY SET-UP AND PROCEDURE
EQUIPMENT:
Marked area appropriate size for age, 4 cones, 11 balls (or any odd number) between 4 players.
SET-UP:

ACTIVITY PROCEDURES:
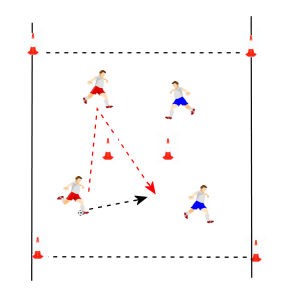
- Set up a clearly marked box area, with a row of balls along the centre of the box. Line the players up at opposite ends of the box.
- The aim is, on the coaches command, to run to the middle line of balls, turn, dribble the ball and stop it on the end line.
- The team with the most balls wins.
Progressions:
- Increase / decrease the marked area
- Add a defender on each side of the balls
- Use weaker foot only
COOL DOWN/ CLOSURE
Review Skill/Activity, stretching, and questions.

by Santosh | Jun 24, 2020 | Soccer, Sports
LEARNING OUTCOME
To improve Goalkeeping techniques
TEACHING CUES
- Communication, keep talking to the defenders and other players around the last 3rd of the pitch (KEEPER’S BALL !!!) Even at training it is good practice to shout loud for the ball
- Keeper to be on toes all the time
- Anticipation & awareness
- Footwork – agility & flexibility
- Stance – bend the knees to lower the body, head and shoulders up straight. The legs are now loaded like springs for quicker reaction to low or high shots
- Decision making regarding the positioning of the hands / arms. Elbows tucked in with hands up or hand low.
ACTIVITY SET-UP AND PROCEDURE
EQUIPMENT:
Marked area, cones and balls
SET-UP:
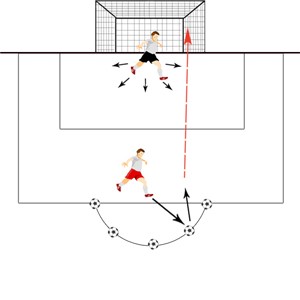
ACTIVITY PROCEDURES:
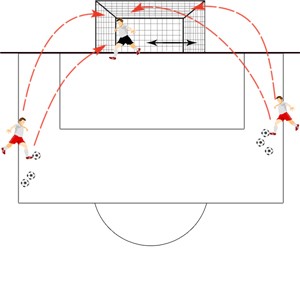
- Play is set up using one goal, one GK, two servers, 10 balls.
- The aim of the drill is for the servers to shoot / volley / throw at the goal in 2 different directions. Server 1 is shown aiming towards the near post both high and low.
- Server 2 is shown aiming high to the near post but also high to the far post.
- The timing of the shots is important, as the aim is to work the goalkeeper, but not to make it impossible for them to save the ball.
Progressions:
- Increase / decrease tempo of shots
- Disguise the shot so the keeper has to make quick decisions.
- Increase the distance between servers and GK to wider areas.
COOL DOWN/ CLOSURE
Review Skill/Activity, stretching, and questions.
by Santosh | Jun 24, 2020 | Soccer, Sports
LEARNING OUTCOME
To improve Goalkeeping techniques
TEACHING CUES
- Keeper to be on toes all the time
- Anticipation & awareness
- Footwork – agility & flexibility
- Starting position
- Saving technique
ACTIVITY SET-UP AND PROCEDURE
EQUIPMENT:
Marked area, cones and balls
SET-UP:

ACTIVITY PROCEDURES:
- Play is set up using one goal, one GK, one forward and 5 balls.
- 1 striker works and has five attempts to score.
- The players come and collect a ball, turn and shoot.
- As soon as the player shoots they must sprint to pick up another ball.
- The aim of the drill is for the goalkeeper to quickly decide on angles, positioning and which technique he is going to use to save the ball, chest save, ‘W’, low dive and if they are going to catch the ball or parry it in to a safe area.
Progressions:
- Ask the forward to mix their shooting technique. Low drives, chip, curl etc.
- The forward must try and round the keeper 1 on 1.
COOL DOWN/ CLOSURE
Review Skill/Activity, stretching, and questions.
by Santosh | Jun 24, 2020 | Soccer, Sports
LEARNING OUTCOME
To improve Goalkeeping techniques
TEACHING CUES
- Keeper to be on toes all the time
- Anticipation & awareness
- Agility & flexibility
- Stance – bend the knees to lower the body, head and shoulders up straight. The legs are now loaded like springs for quicker reaction to low or high shots
- Decision making regarding the positioning of the hands / arms. Elbows tucked in with hands up or hand low.
ACTIVITY SET-UP AND PROCEDURE
EQUIPMENT:
Marked area, cones and balls
SET-UP:

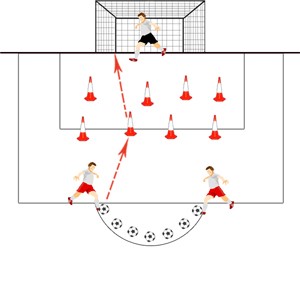
ACTIVITY PROCEDURES:
- Play is set up as in diagram using one goal, one GK, two servers, 10 balls and cones randomly placed in or around the 6yd box.
- The aim of the drill is for the servers (midfielders or forwards) to shoot at the goal along the ground trying to hit a cone on the way, this will obviously deflect the ball in a different direction.
- Players shoot alternatively from either side giving the keeper time to set themselves in between each shot.
Progressions:
- Increase tempo of shots
- Increase / decrease distances between servers, cones and GK.
COOL DOWN/ CLOSURE
Review Skill/Activity, stretching, and questions.
by Neetu | Jun 24, 2020 | Sports
Aim
Learn to maintain a correct posture while taking a stance or pulling the ball side to side
Equipment Required
1 Hockey Stick, 1 ball, 2 saucer cone per student
Play Area Set-Up
- Create boundaries for a large activity area with large cones.
- Scatter saucer cones throughout the area to create a home base for each student.
Activity Description
ACTIVITY 1: Posture
Body Position
- Feet shoulder-width apart
- Knees bent, hips lowered
- Weight on left foot/ball on left side
- Weight on right foot/ball on right side
Ball Position
- The ball position is away from feet.
- Elbows away from the body
- Shift Weight
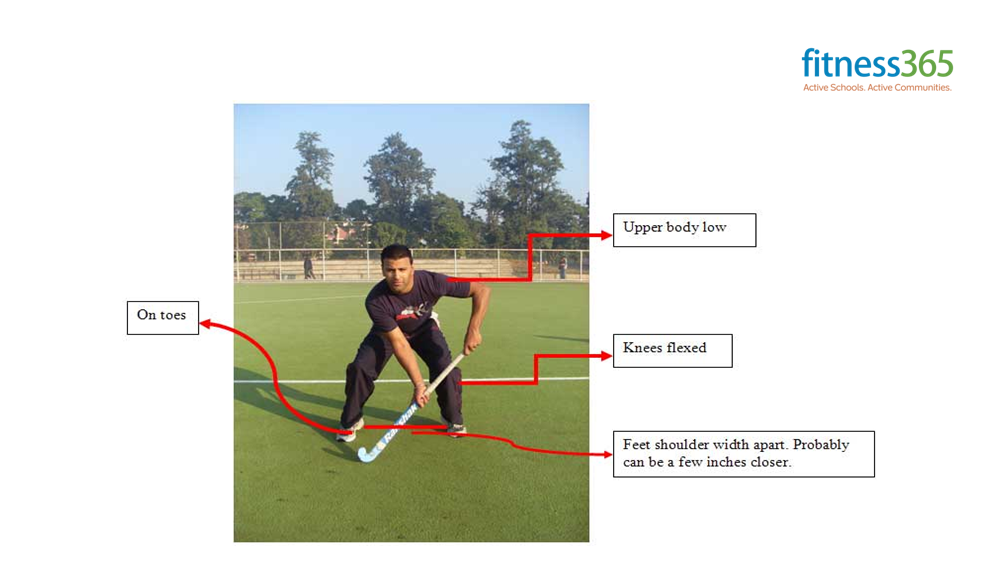
The proper field hockey stance is indicated in the picture above. In the picture, it is showing that you need to keep your upper body low, by bending at the knees as so not to injure your back. You also want to keep your feet about shoulder-width apart and remain on your toes at all times. This is the proper athletic stance for a field hockey player.
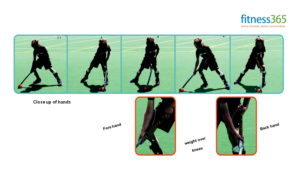
ACTIVITY 1: Drag It
Pull the ball from side to side
- Firm left-hand grip at the top of the stick
- Right hand well down the stick
- Relaxed right-hand acts as a guide
- Turn Stick like opening a door
- Forefinger and thumb form a “V”
- Get used to dribble, trap the ball, and push passing
Activity 1: Hit the Wall
PENDING
Activity 2: Balance & Juggle
Challenge 1: Balance Ball on Stick for as long as possible
PENDING
Challenge 2: Bounce the Ball on the Stick as many times as possible
Challenge 3: Try these tricks with motion: walking and running


