by Neetu | Jun 24, 2021 | Manthan
Learning Outcome
This activity will give the students the opportunity to learn and practice the overhand throw at a target.
Equipment Required
Cut snowman targets from large sections of cardboard and decorate by having students draw and paint on the cutouts. Tape snowmen on the wall Plastic grocery bags (rolled into balls and taped) are used for snowballs. Use a restraining line, such as a jump rope, to keep students about 5’away from the target.
Description
This activity brings the fun of throwing snowballs inside where it is warm, and no one gets cold! Students throw the “snowballs” at the snowman to see if they can hit different parts of the target.
Adaptations for Students with Disabilities
Move target closer to the students if they don’t have the strength to throw the balls to the target. Using plastic grocery bags, you can roll the balls into smaller sizes for students with smaller hands. The rolled bags also allow for better gripping.
by Neetu | Jun 24, 2021 | Manthan
Aim
Work on striking skills and learn how different amount of force is needed while striking
Equipment Required
- 1 Hoop & 1 Beach Volley Ball per pair of students.
- Spot marker/saucer cone for every kid.
Play Area Set-Up
- Scatter spots throughout the activity area.
- Each student with a Beach Volley Ball standing at a spot
Activity Description
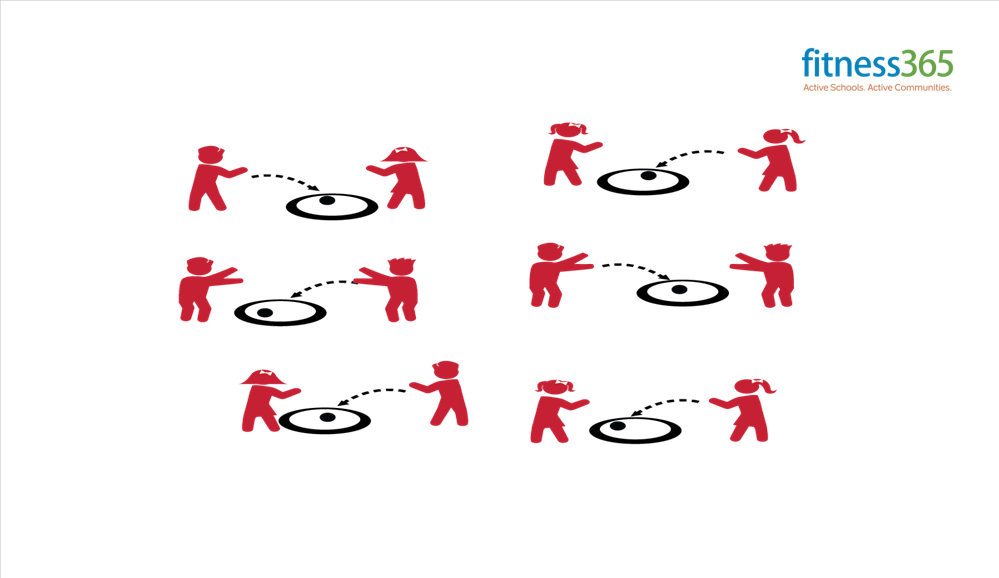
- It’s time to play Bull’s Eye! You’re going to try to underhand serve your ball so that it lands in your hoop.
- On the start signal, take turns serving the ball so that it lands in your hoop.
- Attempt 3 serves and then switch roles with your partner
KEY TEACHING POINTS – Square to Target, Opposite Foot Forward, Tick Tock Swing, Contact Beach Volley Ball with Palm Waist High, Follow Through Up Toward Target
Grade Level Progression
- Introduce the activity with students tossing the ball into the hoop. This establishes the activity management and demonstrates the task objective to the students. Then progress to the underhand serve.
- Implement the activity as written above.
- Challenge students to take a step back from the hoop after 3 successful serves in a row.
Challenges & Modifications
- Play Match Me If You Can. Give each pair a spot marker. Partner A attempts a serve from the spot. If the serve lands in the hoop, Partner B must attempt a serve from the same spot. If not, Partner B can move the spot and attempt a serve.
- Allow students to select an object to serve that promotes greater success and/or enjoyment (e.g., a Beach Volley Ball).
by Neetu | Jun 24, 2021 | Manthan
Aim
- Volley the Beach Volley Ball for maximum possible time till it hits the floor
- Understand self-space while volleying
Equipment Required
- 1 Beach Volley Ball/Foam ball
- 1 spot marker per student
Play Area Set-Up
- Scatter spots throughout the activity area.
- Each student with a Beach Volley Ball or foam ball at a spot
Activity Description
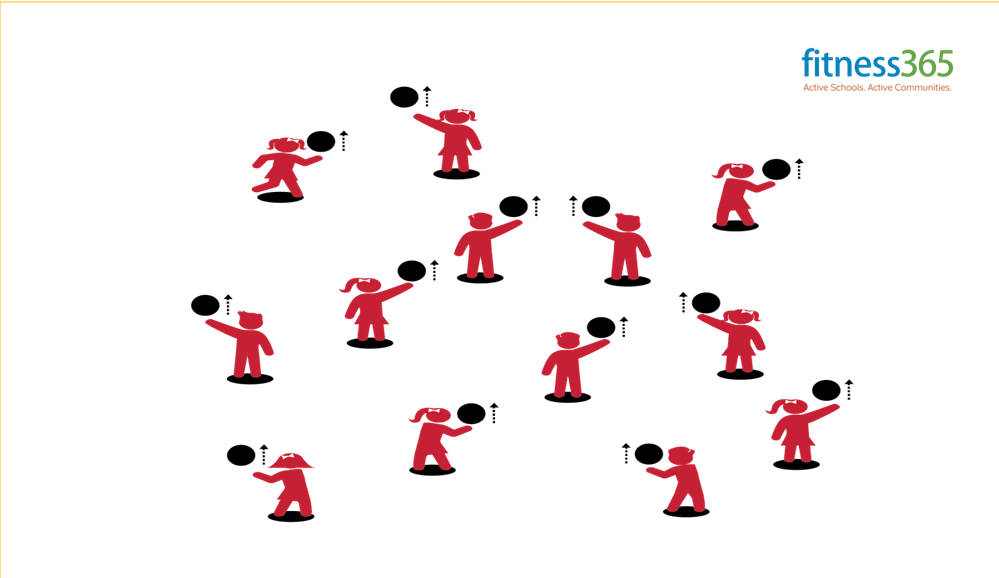
- Let’s play Keep It Up with the Beach Volley Ball!
- On the start signal, practice striking the Beach Volley Ball or ball straight up with your palm.
- How many strikes can you make without dropping the Beach Volley Ball/ball?
KEY TEACHING POINTS – Body in Position, Swing to Strike Low with Palm, Push Up to Strike High with Finger Pads, Follow Through Straight Up
Grade Level Progression
- Students strike and then catch the Beach Volley Ball before striking it again.
- Introduce Beach Volley Ball to students who are ready to progress.
- Emphasize continuous hits.
Challenges & Modifications
- Challenge students to keep the Beach Volley Ball or foam ball up with both their dominant and non-dominant hands.
- Toss the Beach Volley Ball to the student, allowing her/him to track the tossed object and then strike it upward.
by Neetu | Jun 24, 2021 | Manthan
Aim
- Work in personal space to volley Beach Volley Balls upward, and then move safely in general space to find a new Beach Volley Ball
Equipment Required
- 1 Beach Volley Ball
- 1 spot marker per student.
- Music Player.
Play Area Set-Up
- Scatter spots throughout the activity area.
- Each student with a Beach Volley Ball standing at a spot
Activity Description
- This activity is called Musical Beach Volley Ball Bop.
- When the music begins, strike the Beach Volley Ball straight up (with your dominant hand) so that it goes over your head. Strike it straight up as many times as you can before the music stops.
- When the music stops, put the Beach Volley Ball on the spot and then quickly walk to a new spot to find a new Beach Volley Ball.
- When the music starts again, start hitting your new Beach Volley Ball
KEY TEACHING POINTS – Body in Position, Swing to Strike Low with Palm, Push Up to Strike High with Finger Pads, Follow Through Straight Up
Grade Level Progression
- Students strike and then catch the Beach Volley Ball before striking it again.
- Practice with dominant and non-dominant hands. Introduce Beach Volley Ball to students who are ready to progress.
- Emphasize continuous hits with both dominant and non-dominant hands.
Challenges & Modifications
- When the music stops, challenge students to continuously strike the ball while they travel to a new spot. After each pause, they will be at new spots with the same Beach Volley Balls.
- Use the music as a simple start and stop cue. Students freeze and stay on their spots when the music stops, and then continue at the same spots when the music restarts.
by Neetu | Jun 23, 2021 | Manthan
Aim
- Move the ball while moving forward without losing the contact with the stick – keeping under control
- Follow directions by keeping control of equipment and body in order to keep safe and active.
Equipment Required
1 Hockey Stick, 1 ball per student, saucer cones, 4 Large cones for boundary
Play Area Set-Up
- Create boundaries for a large activity area with large cones.
- Line up cones to mark the starting point and endpoint of the dribble. Each student to line up behind the cone.
- Make lanes according to the number of students to allow Dribble with the ball in a straight line for 10m.
Activity Description
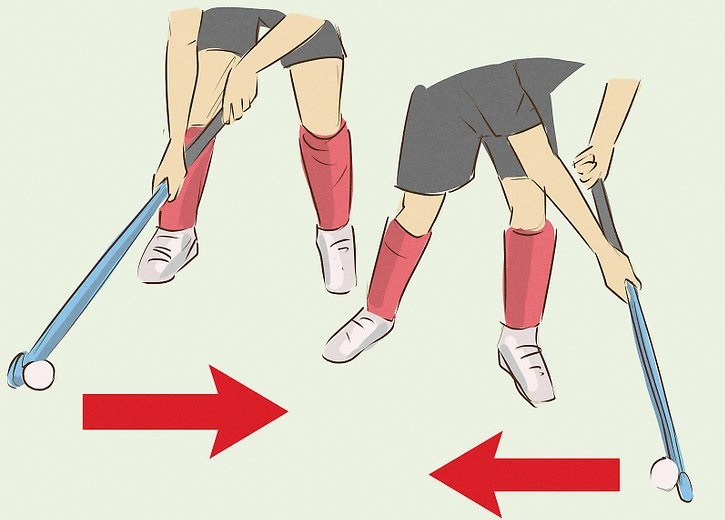
Grip & Stance
- Use basic grip
- The left hand grip the stick at the top of the handle and turns it
- The right hand has a loose grip and allows the stick to be turned but also steers the direction of the stick
- Body position is low (knees bent leaning forward) with the arms extended in front of the body
- The stick is positioned with left hand close to the body and right hand out in front – comfortable stance
- The ball is in front of the body (approximately 1 stick length from the player’s ankle)
Movement:
- Move the ball from right to left – left to right across the body and roll the stick over the ball – no daylight between stick and ball
- Increase the distance of the Indian dribble – start ball, stick, and wrists outside the right side of the body and drag to outside their left
- Keep the ball in front of the body and look up during dribbling (vision)
- Transferring your weight to increase the length of the drag
- Push off on your right foot with the ball on the forehand side – Push off a left foot with the ball on the reverse stick side
- Stick and ball on the right side – look at the time on your watch
TEACHING POINTS FOR INDIAN DRIBBLING
- Keep the ball close to your stick
- Carry the ball out in front & to the side of the right foot
- Bend at the knees–straight back–chin up
- Learn to look up while moving so that you can see what is happening around you and you won’t collide with anyone else
- Roll stick over the front of the ball to stop the ball from moving forward & protect
- The only flat side of the stick can touch the ball
GAME: Red Light Green Light (with INDIAN DRIBBLE)
- It’s time to play Red Light, Green Light while we dribble our footballs. Cars use gasoline as fuel and some use electricity. Our bodies use Calories for fuel and we get Calories from food. When we’re physically active, we burn calories. It’s important that we eat healthy food in order to refuel our bodies. Who can give me some examples of healthy foods?
- Your goal is to dribble your football over the end line where I’m standing. I will be at the traffic light first
- When I call out “Green Light,” you will start to dribble toward the other end line. When I call out “Red Light,” you have to stop and freeze immediately, keeping control of your football
- Any student who doesn’t stop on time must go back to the start.
- When you cross the end line that I’m standing on, you score a point and we’ll restart the game
by Neetu | Jun 23, 2021 | Manthan
Aim
- Use of soft touches on the football in order to keep it in personal space.
- Able to understand and demonstrate positions using the correct vocabulary.
Equipment Required
- 1 football per student
- 1 Saucer cone per student
- Boundary cones
Play Area Set-Up
- Create boundaries for a large activity area with large cones.
- Scatter saucer cones throughout the area to create a home base for each student.
- Each student to a cone with a ball.
Activity Description
- Only do the task when the trainer says “TEACHER Says.”
- If you don’t hear me say “TEACHER Says,” then keep on doing the activity that you were already doing. If you do an activity given without hearing “TEACHER Says,” then do 3 jumping jacks in your personal space before getting back into the game.
- Put 1 foot on the ball, then other foot on the ball; Alternate toe touches on top of the ball; Move around the ball (clockwise / counter-clockwise); Stand (in front, behind, to the side) of the ball; Step over the ball; Side-to-side toe taps.
KEY TEACHING POINTS – Stay Ready (balanced stance, knees slightly bent), Soft Touches with Ball.
