by Neetu | Jun 19, 2020 | Fitness Activity
Posture: Pose – The One-legged
(Pronunciation: eka-pod-ah-sa-na)
Description:
The Sanskrit word Eka means one and pada means foot making this the one-foot, or more commonly, one-legged pose.
Performing Instructions
- Stand with the feet together and the arms by your sides (see the tad-asana).
- Focus the eyes straight ahead on a spot midway between waist and eye level and remain focused there throughout this asana. (standing about five feet from a wall would be helpful).
- Inhale and extend the arms directly in front, parallel with the floor with thumbs touching.
- Exhale and raise the right knee bending the leg at a 90-degree angle, pause for a moment then extend the leg straight out in front pointing the toes forward.
- Pause for a moment then swing the leg back while bending forward at the waist.
- Breath slowly through the nostrils and make sure the arms, torso, and legs are parallel with the floor.
- Hold the posture for at least 30 seconds and then return slowly to a standing position.
Comments:
The ekapada-asana tones and strengthens leg muscles improve the sense of balance and helps sharpen concentration.
The ekpada requires that you become aware of your body/mind as a whole. As you practice this posture turn the attention away from distractions of the mind and center it on full body-awareness. Continual effort in the ekpada-asana in this way will help cultivate concentration.
The “closed eyes” variation (see below) intensifies the effect of the posture. Instead of relying on a fixed point of vision as an “anchor”, the practitioner will cultivate inner stability. The ekpada-asana also gives strength to the hips and lower back.
Duration/Repetitions
This posture should be held for a minimum of 30 seconds and can be extended to up to several minutes. Repeat at least twice on each foot.
Variations
When you can remain in the ekpada effortlessly for at least 30 seconds without wavering or losing balance, try doing it with the eyes closed. This variation makes the posture quite challenging but it increases the benefits as described above.
by Neetu | Jun 19, 2020 | Fitness Activity
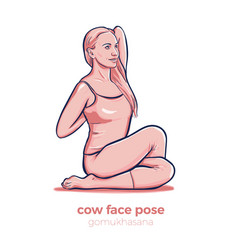
Posture: Gomukha-asana – The Cow face pose
(Pronunciation: ga-roo-dah-sa-na)
Description:
The Sanskrit word garuda means eagle. In Hindu mythology, Garuda is known as the king of birds. He transports the God Vishnu (shown with a bow and arrow in the illustration to the left) and is said to be eager to help humanity fight against daemons.
“Placing the right ankle on the left side and the left ankle on the right side, makes Gomukha-asana, having the appearance of a cow.”
Performing Instructions
- Sit in a crossed leg position, right leg over left.
- Spread the legs as far apart as possible without bending the knees.
- Bend the left knee and place the bottom of the left foot against the inner left thigh. Bring the left heel as close to the perineum as possible. Keep the left knee on the floor.
- Grasp the right foot with the left hand and keeping the foot on the floor place the heel of the right foot against the front-left portion of the left buttock. The right knee should be directly on top of the left knee..
- Inhale slowly through the nostrils and raise the right hand over the head and bend the right elbow. Reach behind the back with the left hand and clasp the fingers of both hands (forming an “s” shaped lock).
- Hold the posture as long as you can comfortably hold the inhale breath. Exhale slowly and then repeat the posture reversing the arms and legs.
Comments:
This posture stretches the arms, upper back, chest, and sides of the chest and abdomen. As the shoulder blades are stretched backward the lungs are expanded and as the abdominal muscles are lifted the stomach is toned. It helps to relieve neck strain, backache, and tight shoulders. The hands, fingers, and wrists are strengthened.
Duration/Repetitions
You can either hold the posture while the breath is held or you can try holding the posture while breathing gently through the nostrils. If you choose to breath, then hold the posture for thirty seconds to a minute. Repeat the gomukha-asana two to three times on each side.
Variations
If you are unable to lock the fingers behind the back you may grasp one end of a small piece of cloth in the right hand and the other end of the cloth in the left hand.
by Neetu | Jun 19, 2020 | Fitness Activity
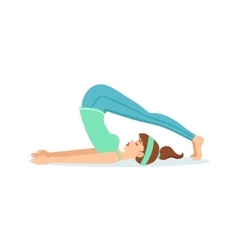
Posture: Hala-asana – The Plow Pose
(Pronunciation: hull-ah-sa-na)
Description:
The Sanskrit word Hala means plow, as in a traditional plow that is drawn by a horse or oxen. When performing this posture your body resembles a plow.
Performing Instructions:
- Lie flat on the back in the shava-asana (the corpse pose).
- Inhale through the nostrils. Place the palms face-down on the floor. Keeping the hips on the floor, bend the knees and bring them up toward the stomach while exhaling.
- Inhale, then while exhaling, raise the legs straight up perpendicular to the floor. You may support your hips with your hands or leave the arms flat on the floor, whichever is most comfortable.
- Exhale and continue to raise the legs over the head, bending at the waist, lifting the back and buttocks until the toes touch the floor directly in the back of the head. Keep the feet together. If the lower back is supported by the hands try returning the arms flat to the floor with the palms facing down. If you are unable to comfortably place the arms on the floor continue to support the lower back with the hands.
- Keep the knees straight. Breath slowly through the nostrils and hold the posture for several minutes. If you cannot touch the floor with your toes hold them as close to the floor as possible and continue to exert effort to lower them.
- Reverse the steps to return to the shava-asana.
Comments:
The benefits of this posture, like the savanna-asana, are numerous. All of the muscles and ligaments in the calves and thighs are stretched resulting in greater leg flexibility. People suffering from leg cramps will find great relief from the hala-asana.
Since the abdominal area is contracted, blood compressed out of this area releases toxins and when the contraction is released the area is flooded with richly oxygenated blood. The contraction also helps to relieve gas and stimulates a sluggish digestive system. Similar effects take place as the neck and chest area is compressed affecting the throat, thyroid, hyperthyroid, and lungs. Upper and lower back pain or discomfort are relieved due to the forward stretching of the spine.
It is highly recommended that this posture be accompanied by the sarvanga-asana. In fact, many of the benefits of the sarvanga-asana apply to the hala-asana as well with the added benefits detailed above.
The hala-asana is an excellent morning posture although some might find it more difficult then. During sleep the spine can become somewhat compressed resulting in the experience of tightness or stiffness in the back. A few repetitions of the hala-asana will quickly restore flexibility to the spine as well as promote alertness.
Duration/Repetitions
Hold the hala-asana for as long as you are comfortable. 20-30 seconds is fine for early attempts, increase the time gradually as you become more comfortable.
Variations
There are several variations of the basic hala-asana each of which requires greater flexibility in the spine and legs. Once one is adept at performing this asana these variations may be tried. The first entails swinging the arms around and either touching or grasping the toes with the hands (1). The posture is then held in this position. (illustrated above)
Another variation calls for dropping the knees to the ground and placing them close the ears and keeping the arms extended on the floor (2). And finally from this variation the arms are swung around and placed over the legs behind the knees and the hands are clasped and pressed down on the knees to hold them firmly on the floor (3). All three variations are held while breathing gently gently through the nostrils.
Cautions/Restrictions
The hala-asana should not be performed by women who are menstruating, as is the case with all inverted postures (where the legs are raised over the head). No other restrictions apply.

by Neetu | Jun 19, 2020 | Fitness Activity
Posture: Hasta-pada-angusta-asana (The Hand-Foot-Big Toe Pose)
Pronunciation: ha-sta-pah-don-goo-stah-sa-na
Description:
The Sanskrit word hasta means hand, pada means foot, and angusta means big toe therefore this is the hand-foot-big toe posture.
Performing Instructions
- Sit on the floor with the legs together and extended straight out in front. Keep the back straight, shoulders level and head straight. Place the hands, palms down, flat on top of the thighs.
- Spread the legs as far apart as possible without bending the knees.
- Bend the left knee and place the bottom of the left foot against the inner left thigh. Bring the left heel as close to the perineum as possible. Keep the left knee on the floor.
- Stretch both arms straight out in front of you, then keeping the back straight turn slowly at the waist toward the right aligning the arms with the right leg.
- Inhale slowly while raising the arms over the head and arching the back.
- Exhale and slowly while bending forward bringing the chest down to the right thigh. Clasp the big toe of the right foot with the first finger of both hands. Hold this position for the duration of the exhaled breath.
- Inhale slowly through the nostrils releasing the posture while sitting up straight.
- Straighten the left leg and return to the seated position described in step 2 then repeat the posture, this time bending the right leg.
Comments:
The benefits of the hasta-pada-angusta-asana are similar to those of the ugra-asana (i.e.: spinal stretch, abdominal toning, gastro-intestinal stimulation). There is additional stretching of the leg that is outstretched as well as to the groin.
Duration/Repetitions
Repeat two or three times on each leg.

by Neetu | Jun 19, 2020 | Fitness Activity
Posture: Shava-asana: The Corpse Pose (Pronunciation: sha-vah-sa-na)
Description:
The Sanskrit word shava means corpse hence this is the Corpse. The shava-asana is also known as the mrta-asana.
Performance Instructions
- Lie flat on your back with your legs together but not touching, and your arms close to the body with the palms facing up.
- Keep your eyes gently closed with the facial muscles relaxed and breath deeply and slowly through the nostrils.
- Starting at the top of the head and working your way down to the feet, bring your attention to each part of your body, consciously relaxing it before proceeding on to the next.
- Remain in the shava-asana for between 3 and 5 minutes or longer. If you become sleepy while in the shava-asana begin to breath a bit faster and deeper.
Comments:
While many consider this a simple posture at first, its simplicity eventually proves to be deceiving. The goal of the shava-asana is for the body and mind to be perfectly still and relaxed. Not only should the body be motionless and at ease, but the mind as well should be quiet, like the surface of a still lake. The result will be a deep and stable relaxation that will extend into your meditation or be felt through the activities of your daily circumstances.
It goes without saying that the shava-asana will take some time to perfect. You will find the simple exercise of focusing your attention on each part of your body and consciously directing the breath there to be a great help with this posture.
There are two common obstacles that can prevent you from fully benefitting from this posture: sleepiness and a restless mind. If find yourself getting drowsey while in the shava-asana increase the rate and depth of your breathing. If your mind is restless or wondering focus your attention on all of the bodily senations you’re experiencing. Bring your mind to the sensation of the floor beneath you or on the rhythm of your breath.
While practing your Yoga-asana routine you should always begin and end each session with the shava-asana.
Duration/Repetitions
We recommend that you begin your period of yoga-asana practice with at least 3-5 minutes of shava-asana. Return to it periodically throught your posture session to relax and rejuvinate the body/mind and then conclude your session with at least 3-5 minutes more
by Neetu | Jun 19, 2020 | Fitness Activity
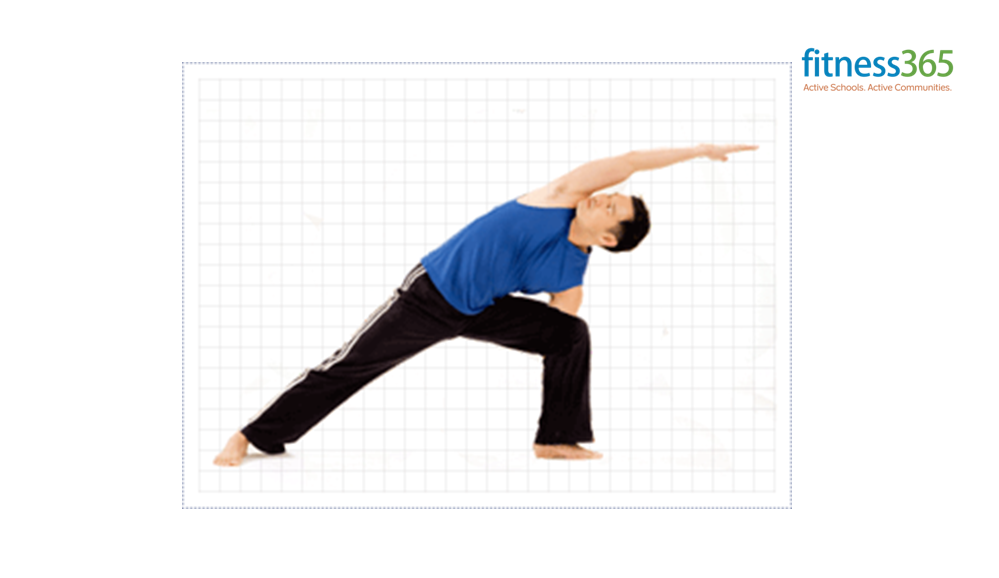
Posture: Parivritta-parshvakona-asana: The Turned Side-Angle Pose
(Pronunciation: par-ee-vrit-ah parsh-va-cone-ah-sa-na)
Description:
The Sanskrit word parivritta means revolved, turned round or back, Parva means side and Kona means angle.
Performing Instructions
- Stand with the feet together and the arms by your sides (see the tad-asana).
- Inhale and spread your legs apart slightly further than shoulder distance (about 3-4 feet).
- Stretch your arms straight out from the shoulders parallel to the floor with your palms facing down.
- Exhale slowly and turn your right foot toward the right 90 degrees. Bend your right knee about 90 degrees.
- Place the palm of your left-hand flat on the floor next to the outside of your right foot. Rest the right elbow on the outside of the right knee.
- Stretch the right arm over your head, parallel with the floor, with the inside of the elbow resting on the ear. Hold for abot 30-60 seconds while breathing gently through the nostrils.
- Slowly return to a standing position and repeat on the other side reversing directions 2-6.
Comments
The parivritta-parshvakona-asana stretches the muscle group along the side of the torso. It strengthens the ankles, calves, and thighs as well as the arms. It is also an excellent posture to tone the muscles in the waist and hips. This posture also strengthens the digestive system and thus aids digestion, stimulates blood circulation, and assists in restoring strength and flexibility to the spine.
Duration/Repetitions
Hold the posture for as long as is comfortable. Performing the parivritta-purvashakona-asana once on each side is considered one repetition. Do 2 or 3 repetitions.


