by Neetu | Jun 22, 2020 | Fitness Activity
Aim
To do the correct number of consecutive jumps in a row using a self-turned rope
Equipment Required
- 1 Skipping Rope per student
- 9 half cones for boundaries and mid-line
Play Area Set-Up
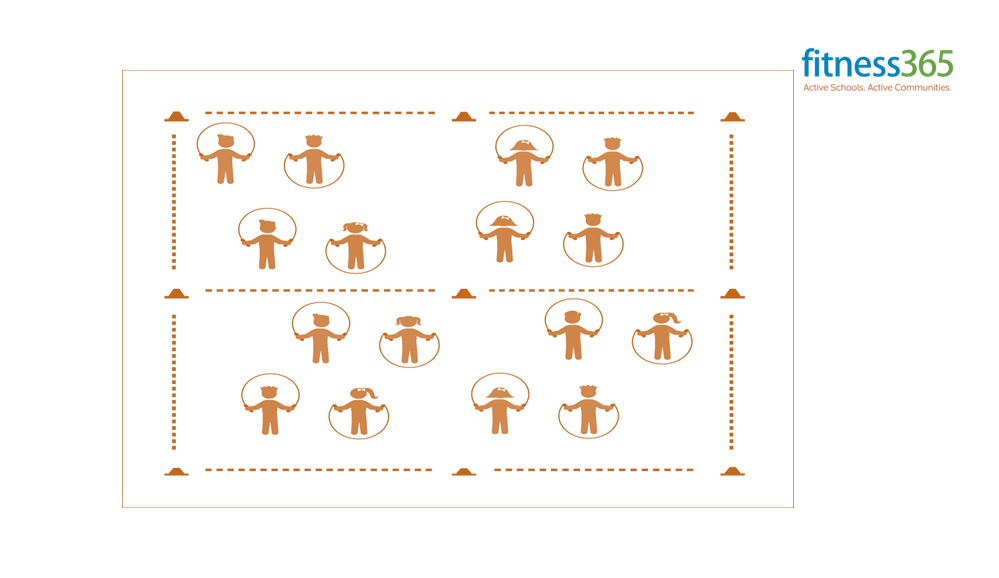
- Create a large activity space using 6 cones.
- Divide the area in half using 3 other cones. One side is Minor League, the other is Major League.
- Scatter students with ropes on the Minor League side.
- Students face one another with enough distance to safely turn a Skipping Rope
Activity Description
- Match Me If You Can is a head-to-head Skipping Rope challenge game. The object is for you to make more consecutive jumps than your partner, and then move to the Major League side of the gym where you’ll compete with another player for Major League points.
- The gym is divided in half. We’re starting on the Minor League side, and the other is the Major League side. Play Rock, Paper, Scissors (RPS) to determine who will be Partner 1 and who will be Partner 2.
- When I say, “GO!” Partner 1 will go first and attempt to do 15 jumps in a row. When Partner 1 is done, Partner 2 will attempt to do 15 jumps in a row. If both reach 15 jumps, play RPS again to see who wins.
- The partner with the most consecutive jumps will move to the Major League side and look for a new partner. The other will stay on the Minor League side and look for a new partner.
- When 2 partners compete on the Major League side, the winner stays (and earns one Major League point), and the other partner moves back to the minor league side to try again.
Progression:
Easy: Play the game as described above.
Hard: When students compete on the major league side, require at least 1 Skipping Rope trick in the 15 jumps.
Challenge: Students play in pairs and perform 16 count Skipping Rope routines to be matched by a competing pair. Provide time prior to the activity for routine development.
by Neetu | Jun 22, 2020 | Fitness Activity
Aim
To do as many consecutive jumps in a row as I can using a self-turned rope.
Equipment Required
- 9 low profile cones for boundary and midline
- Skipping rope for each student
- 12 hula hoops, 12 dice, Bean bags (about 5 bags per hoop)
Play Area Set-Up
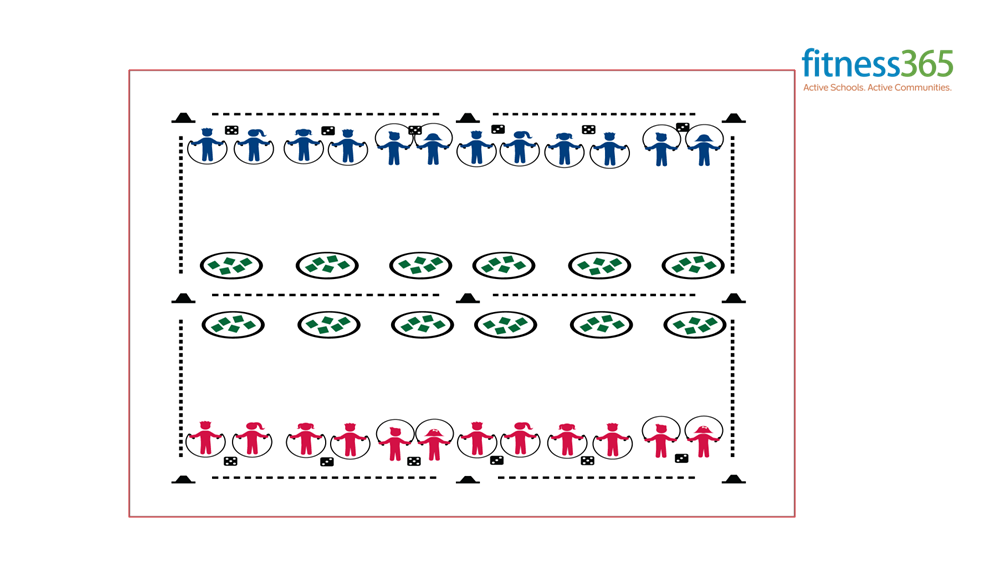
- Use the cones to create a large activity area and divide it in half
- 6 hula hoops on each side near the mid line
- About 5 bean bags inside each hoop
- 6 dice on each side of the activity area
- Divide the class into 2 groups and send 1 group to each side of the activity area
Activity Description
- The game of Skipping Rope Battle Bags is a challenge between two teams. Team A is on 1 side of the activity area, and Team B is on the other side.
- The objective is for you to get rid of your team’s beanbags and be the team with the fewest remaining bags when the game is over.
- You’ll work in pairs. You and your partner will roll a set of dice to determine the number of jumps to complete before you can collect and toss a beanbag. Both partners must complete a number of jumps equal to the total of the dice.
- After both partners have completed jumps, you’ll both run to 1 of your team’s hoops, take 1 bean bag each, and toss it into 1 of the other team’s hoops. Then, quickly run back to the dice and roll again. (If you miss the hoop, quickly pick the beanbag up and place it in a hoop.)
- Continue until you hear the stop signal.
Progression:
EASY: Play the game as described.
HARD: Increase intensity with a star jump (or another exercise) in between jumps and running to collect a bean bag.
by Neetu | Jun 19, 2020 | Fitness Activity
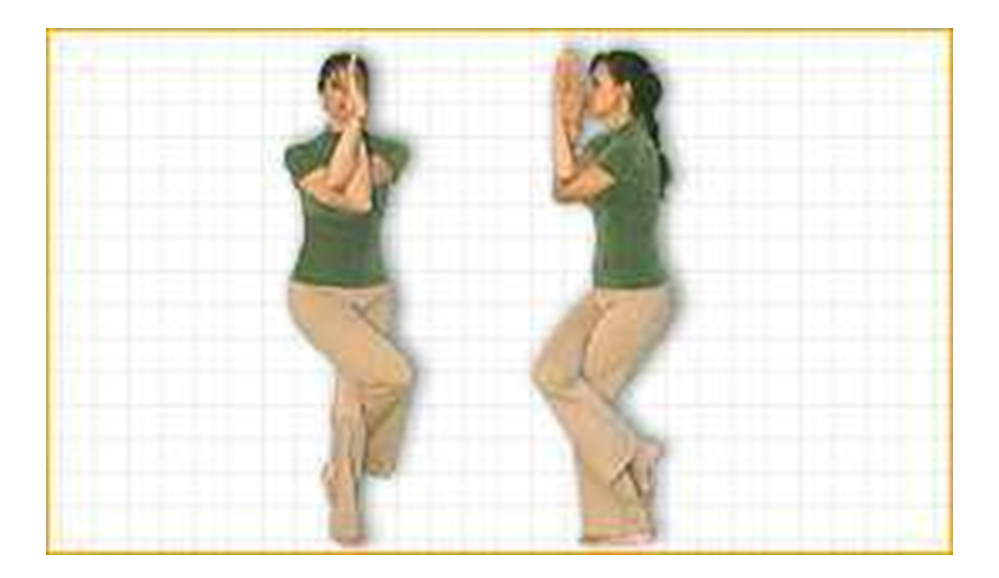
Posture: Garuda-asana – The Eagle Pose
(Pronunciation: ga-roo-dah-sa-na)
Description:
The Sanskrit word garuda means eagle. In Hindu mythology, Garuda is known as the king of birds. He transports the God Vishnu (shown with a bow and arrow in the illustration to the left) and is said to be eager to help humanity fight against daemons.
Performing Instructions
- Lie flat on the back in the shava-asana (corpse pose).
- Stand with the feet together and the arms by your sides (see the tad-asana).
- Draw the left foot upward bending the knee and wrap the left foot around your right leg as you rest the back of your left thigh on the right thigh.
- Cross your arms at the elbows, left over right.
- Join the palms of your hands together keeping the fingers pointed upward.
- Inhale and hold the posture for the duration of the inhaled breath.
- Exhale and return to the tada-asana. Repeat the posture on the opposite side, wrapping the right leg over the left and the right arm over left.
Comments:
The Garuda-asana will strengthen the legs, knees, and ankles. It stretches and tones muscles of the leg and can help relieve cramps of the legs.
Duration/Repetitions
Hold the Hala-asana for as long as you are comfortable. 20-30 seconds is fine for early attempts, increase the time gradually as you become more comfortable. You can also try holding the posture for as long as you can hold the inhaled breath. Repeat 2 or 3 times on each leg.

by Neetu | Jun 19, 2020 | Fitness Activity
Posture: Pose – The One-legged
(Pronunciation: eka-pod-ah-sa-na)
Description:
The Sanskrit word Eka means one and pada means foot making this the one-foot, or more commonly, one-legged pose.
Performing Instructions
- Stand with the feet together and the arms by your sides (see the tad-asana).
- Focus the eyes straight ahead on a spot midway between waist and eye level and remain focused there throughout this asana. (standing about five feet from a wall would be helpful).
- Inhale and extend the arms directly in front, parallel with the floor with thumbs touching.
- Exhale and raise the right knee bending the leg at a 90-degree angle, pause for a moment then extend the leg straight out in front pointing the toes forward.
- Pause for a moment then swing the leg back while bending forward at the waist.
- Breath slowly through the nostrils and make sure the arms, torso, and legs are parallel with the floor.
- Hold the posture for at least 30 seconds and then return slowly to a standing position.
Comments:
The ekapada-asana tones and strengthens leg muscles improve the sense of balance and helps sharpen concentration.
The ekpada requires that you become aware of your body/mind as a whole. As you practice this posture turn the attention away from distractions of the mind and center it on full body-awareness. Continual effort in the ekpada-asana in this way will help cultivate concentration.
The “closed eyes” variation (see below) intensifies the effect of the posture. Instead of relying on a fixed point of vision as an “anchor”, the practitioner will cultivate inner stability. The ekpada-asana also gives strength to the hips and lower back.
Duration/Repetitions
This posture should be held for a minimum of 30 seconds and can be extended to up to several minutes. Repeat at least twice on each foot.
Variations
When you can remain in the ekpada effortlessly for at least 30 seconds without wavering or losing balance, try doing it with the eyes closed. This variation makes the posture quite challenging but it increases the benefits as described above.
by Neetu | Jun 19, 2020 | Fitness Activity
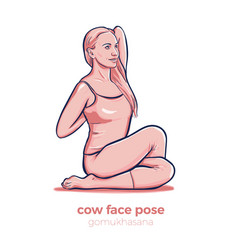
Posture: Gomukha-asana – The Cow face pose
(Pronunciation: ga-roo-dah-sa-na)
Description:
The Sanskrit word garuda means eagle. In Hindu mythology, Garuda is known as the king of birds. He transports the God Vishnu (shown with a bow and arrow in the illustration to the left) and is said to be eager to help humanity fight against daemons.
“Placing the right ankle on the left side and the left ankle on the right side, makes Gomukha-asana, having the appearance of a cow.”
Performing Instructions
- Sit in a crossed leg position, right leg over left.
- Spread the legs as far apart as possible without bending the knees.
- Bend the left knee and place the bottom of the left foot against the inner left thigh. Bring the left heel as close to the perineum as possible. Keep the left knee on the floor.
- Grasp the right foot with the left hand and keeping the foot on the floor place the heel of the right foot against the front-left portion of the left buttock. The right knee should be directly on top of the left knee..
- Inhale slowly through the nostrils and raise the right hand over the head and bend the right elbow. Reach behind the back with the left hand and clasp the fingers of both hands (forming an “s” shaped lock).
- Hold the posture as long as you can comfortably hold the inhale breath. Exhale slowly and then repeat the posture reversing the arms and legs.
Comments:
This posture stretches the arms, upper back, chest, and sides of the chest and abdomen. As the shoulder blades are stretched backward the lungs are expanded and as the abdominal muscles are lifted the stomach is toned. It helps to relieve neck strain, backache, and tight shoulders. The hands, fingers, and wrists are strengthened.
Duration/Repetitions
You can either hold the posture while the breath is held or you can try holding the posture while breathing gently through the nostrils. If you choose to breath, then hold the posture for thirty seconds to a minute. Repeat the gomukha-asana two to three times on each side.
Variations
If you are unable to lock the fingers behind the back you may grasp one end of a small piece of cloth in the right hand and the other end of the cloth in the left hand.


