by Neetu | May 27, 2020 | Fitness Activity
Aim
- Use of soft touches on the noodle in order to keep it in personal space.
- Able to understand and demonstrate positions & movements using correct vocabulary
Equipment Required
1 noodle per student, 1 spot marker per student
Play Area Set-Up
- Create boundaries for a large activity area with large cones.
- Scatter spot markers throughout the area to create a home base for each student.
- Each student to get a noodle
Activity Description
Revise the concept of personal space and Reemphasize on working in personal space
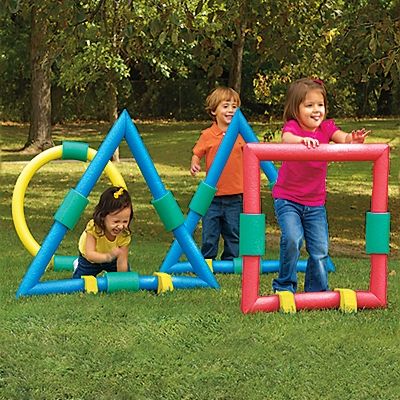
Activity 1: Thread the Needle
While standing with legs widespread and have the students move the noodle (using both hands) into the space between the legs
- from front to back around one leg only
- repeat the same with other legs
- have them take turns around both legs making a figure of 8
- have then turned is around their neck & head
Activity 2: Car & Driver
Make it a partner game where one partner holds the noodle under each arm. Have the other student behind them holding the ends of the noodle. The person at the back is the driver; the person in front is the car. Practice safe moving without bumping into other cars played by fellow students. Have students switch jobs.
** Remind students NOT to excessively bend the noodles.
Challenges: You can spice it up and add challenges with noises or traffic commands.
Activity 3: Noodle Alphabet
Partners work together to spell simple words using their noodles and their bodies. Each pair will start on one end of the playing area. On the other side of the space, the teacher will place flashcards with vocabulary words. When the activity begins, one partner as time will jog and pick up a flashcard and bring it back. Once back together, the partners will work together to spell the vocabulary word one letter at a time. When the task is complete, the second partner will return the flashcard and pick up a new one. How many words can each team spell in a time designated by the teacher?
by Neetu | May 26, 2020 | Fitness Activity
Aim
- Work on developing hand/eye coordination and Striking Skills
- Get the batting & Throwing basics correct for Grip, Stance, Movement while making the shot.
Equipment Required
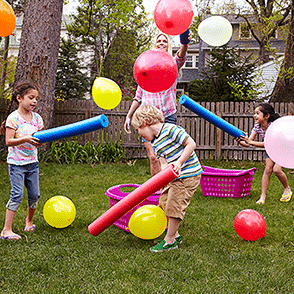
Cones, 1 Noodle & Balloon per student
Play Area Set-Up
- Create boundaries for a large activity area with large cones.
- Each student will need a bat (noodle) and a ball (balloon).
- Place spot markers or cones on the floor as goals.
Activity Description –
- Each student will need to find an open space for the activity. While in their open space, they will toss the ball (balloon) up in the air and attempt to hit it with their bat as it falls to the ground.
- Students may hit their balls in any direction. Once the ball is away from the hitter, the student will place their bat on the floor and carefully go and collect the ball then return home before swinging again.
Fun Activity: Beat the Bucket
A fast-paced game where strategy, agility, maneuvering skills, and strength are put to test. Teams are divided into batting and fielding teams where the batting team hit 3 balls continuously and runs between two cones to score while fielding team collects all ball and return to the bucket (a hoop) as quickly as possible and prevent the batting team to score as low as possible
In the game, each batting team member strikes 3 balloons by tossing one by one using the bat (noodle), and individual runs are noted. The final team score is calculated which becomes a chasing score for the bowling team.
If there are more than 2 groups, use 2 different play areas to ensure students do not have to wait for long.
by Neetu | May 25, 2020 | Fitness Activity
Aim
Students will be able to perform the locomotor skills and will be able to call out what letter (or number) they have landed on
Equipment Required
- Four cones for boundaries (same color).
- Spot marker for every kid.
- Music Player & pen drive.
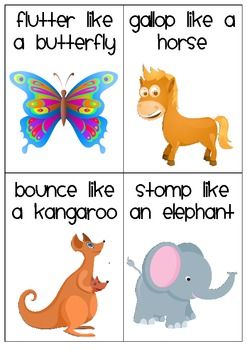
- Skill Cards of a horse galloping.
- Hula-hoops.
- Ropes
Play Area Set-Up
Layout letter cards over a large area. Show students the area around the cards where they will be walking/running and other locomotor skills
Activity Description
- Today we are going to learn how to gallop, just like a horse!
- Demonstrates how to gallop: USE RELEVANT SKILL CARDS
- In galloping, you step forward with one foot that is always your “lead” foot.
- The toes of your back foot chase the heel of your lead foot, like skipping.
- Both feet leave the ground, and you land on your back foot, followed by your lead foot.
- When galloping, point both feet forward. Arms swing forward at the same time the back foot moves forward. Head up and look forward.
Practice:
- Ask children to gallop in a line to the opposite side of the activity space.
- Gallop alongside any children who have difficulty (model the movement).
- With a partner, children spread out around activity space and practice the “step-toe-to-heel” pattern.
- Invite children to gallop and work together to make shapes as they gallop (circle, figure eight, triangle, following a line on the floor
- Leaders should encourage children to try galloping with opposite foot leading.
Lets Play Game: Galloping horses relay race
- Divide children into 4 or 5 groups with even numbers.
- Designate a start line at one end of the activity space.
- For each group, the leader places a cone at the other end of the activity space to mark their turn-around point.
- Groups line up behind the start line.
- Each group has one skipping rope which will be used as the “reins” to lead the horse.
- The first person in line is the horse, and they place the reins around their waist.
- The second person in the line holds the reins as if they are guiding the horse.
- In pairs (horse and guide), children gallop around the turn around point and back to the start.
- When they reach the start line, they pass the reins to the next pair in their group.
- The first group to have every pair complete the course wins.
Wrap-up (2 minutes)
- Call the children back into a circle and review what they learned today.
- Why is it important to swing your arms when you are galloping?

by Rashmi Sharma | May 16, 2020 | Fitness Activity
This move enables players to quickly change direction to avoid a defender.
- Each player dribbles a ball in the forward direction.
- The player then steps on the ball with the sole of their foot and drags or pulls it backwards or sideways and turns their body to then face the ball.
- The player can then continue to dribble the ball in the new direction.
Soccer truly is a fun, accessible, and popular sport. As with all sports, the more the focus is kept on age-appropriate, fun, skill-developing games, the more engaged your child will be with the sport and the more they will want to get out and play.
by Rashmi Sharma | May 16, 2020 | Fitness Activity
- Give each player a ball.
- Players pass the ball from the inside of their right foot to the inside of their left foot while maintaining control of the ball and their body. Have them pass the ball back and forth between their feet a number of times in order to increase their level of control with the ball. For younger players, saying “ding dong” while passing the ball from one foot to the other is fun.