by Neetu | Jun 18, 2020 | Fitness Activity
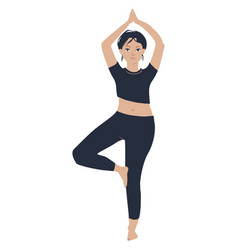
Posture: Vriksha-asana – The Tree Pose
(Pronunciation: vrik-shah-sa-na)
Description:
The Sanskrit word vriksha means tree, thus this is the Tree Posture.
“Standing straight on the left leg, bend the right leg and place the right foot on the root of the left thigh. Stand thus like a tree on the ground. This is called vriksha-asana.”
Performing Instructions
- Stand with the feet together and the arms by your sides (see the tad-asana).
- Bend the right leg at the knee, raise the right thigh, and bring the sole of the right foot as high up the inside of the left thigh as possible.
- Balancing on the left foot, raise both arms over the head keeping the elbows unbent and joining the palms together. Hold the posture while breathing gently through the nostrils for about 10 complete breaths.
- Lower the arms and right leg and return to the tad-asana, standing position with feet together and arms at the sides. Pause for a few moments and repeat on the opposite leg.
Comments:
The challenge of the vriksha-asana is maintaining balance on one leg. Poor balance is often the result of a restless mind or distracted attention. Regular practice of this posture will help focus the mind and cultivate concentration (dharana).
When practicing vriksha-asana it may help to imagine or picture a tree in the mind and apply the following technique: Imagine that the foot you are balanced on is the root of the tree and the leg is the trunk. Continue by imagining the head and outstretched arms as the branches and leaves of the tree. You may be unsteady for a while and find the body swaying back and forth, but don’t break the concentration. Like a tree bending in the wind and yet remaining upright, the body can maintain balance.
Aim to achieve the “rootedness” and firmness of a tree. Regular practice of the vriksha-asana improves concentration, balance and coordination. Because the weight of the entire body is balanced on one foot, the muscles of that leg are strengthened and toned as well.
Duration/Repetitions
Hold the vriksha-asana as long as you comfortably can. Repeat it two or three times on each leg.
by Neetu | Jun 18, 2020 | Fitness Activity
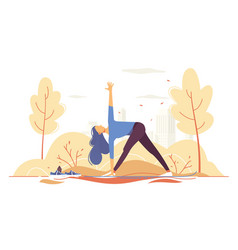
Posture: Trikona-asana – The Triangle Pose
(Pronunciation: tri-cone-ah-sa-na)
Description:
The Sanskrit word tri means three and Kona means corner or angle. Thus “three corners or three-angle posture” is often called the triangle posture. This posture is also known as the utthita trikona-asana. Utthita means stretched or extended thus this is the Extended Triangle Pose.
Performing Instructions
- Stand with the feet together and the arms by your sides (see the tada-asana).
- Separate the feet slightly further than shoulder distance apart.
- Inhale and raise both arms straight out from the shoulders parallel to the floor with the palms facing down.
- Exhale slowly while turning the torso to the left, bend at the waist and bring the right hand down to the left ankle. The palm of the right hand is placed along the outside of the left ankle. The left-arm should be extended upward. Both legs and arms are kept straight without bending the knees and elbows.
- Turn the head upward to the left and gaze up at the fingertips of the left hand. Inhale and return to a standing position with the arms outstretched.
- Hold this position for the duration of the exhaled breath. Exhale and repeat steps 4 – 6 on the opposite side.
Comments:
The trikona-asana is an excellent posture to do early in your routine. The forward bending and lifting stimulates blood flow and helps to stretch and relax the back, shoulders, legs, and arms as well as increases the flow of blood to the head. The muscles of the thighs and calves, as well as the hamstrings, are stretched. The slight twist of the spine creates suppleness in the spinal discs and relieves lower back discomforts.
The posture can be held longer by breathing gently through the nostrils rather than holding the breath. Another variation is to perform the trikona-asana rapidly thereby giving it a slightly aerobic effect.
Duration/Repetitions
Remain in the forward bending position for the duration of the exhale breath. Do two or three repetitions (one repetition consists of bending forward on both sides).
by Santosh | Jun 18, 2020 | Soccer, Sports
LEARNING OUTCOME
To improve shooting technique
TEACHING CUES
- Accuracy of shot
- Shot selection (driven, side foot placed, lob, curl, etc)
- Vision, awareness of goalkeepers position
ACTIVITY SET-UP AND PROCEDURE
EQUIPMENT:
1 goal, 1 ball and 3 players
SET-UP:
ACTIVITY PROCEDURES:
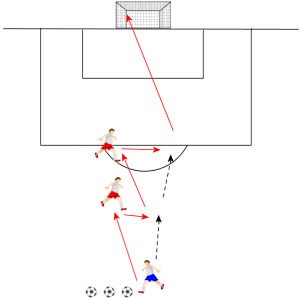
- 1 striker works with 2 other players, the player has 3 attempts to score.
- The striker passes a ball to the closest player who plays the ball back as the striker is running at goal.
- The striker then does the same with the other player, receives it back and then runs towards the goal and shoots.
- As soon as the player shoots they must sprint to the starting cone and repeat activity.
- Swap roles and repeat the drill.
Progressions:
- Must be high tempo.
- One shot must be with weaker foot.
- Add defenders to pressure player as he picks up the ball.
COOL DOWN/ CLOSURE
Review Skill/Activity, stretching, and questions.

by Santosh | Jun 18, 2020 | Soccer, Sports
LEARNING OUTCOME
To improve shooting, and scoring ability.
TEACHING CUES
- Player B’s lay off should be timed correctly so player A can run onto it and shoot.
- Player A should concentrate on keeping their head and knee over the ball to keep the shot low.
ACTIVITY SET-UP AND PROCEDURE
EQUIPMENT:
1 goal, 2 cones
SET-UP:
ACTIVITY PROCEDURES:
- Player A starts with a ball.
- They pass it to a player B who is standing around the edge of the 18 yard area.
- Player B lays the ball off in 1 or 2 touches.
- After player A passes to player B they make a move towards the goal and shoot 1st time from player B’s lay off.
- Switch player B so everyone gets a chance to shoot.
Progressions:
- Add a goalkeeper and maybe a defender.
- Player B chips for a volley
COOL DOWN/ CLOSURE
Review Skill/Activity, stretching, and questions.
by Neetu | Jun 18, 2020 | Fitness Activity
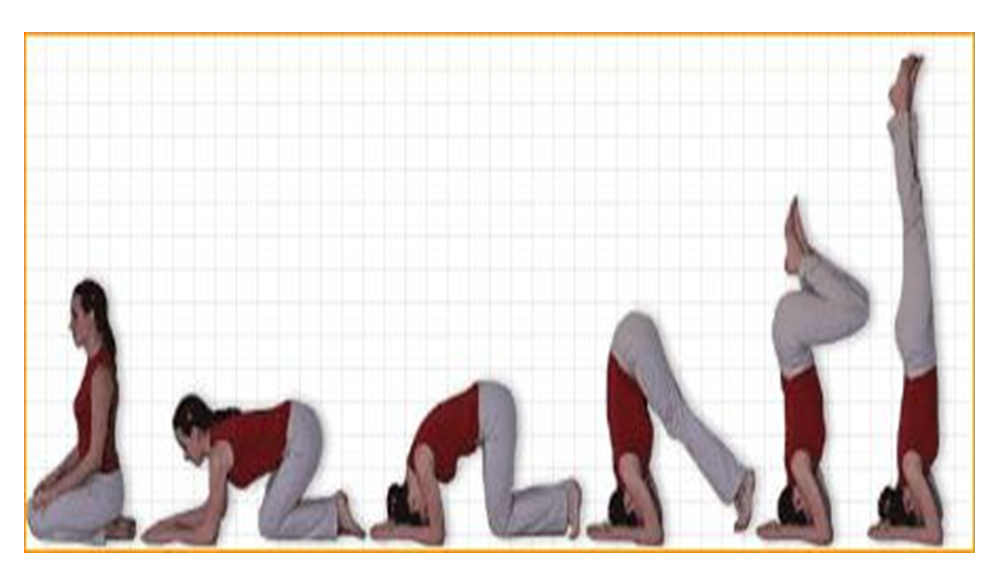
Posture: Sirsha-asana – The Head-stand
(Pronunciation: sir-shah-sa-na)
Description:
The Sanskrit word sirsha means head. This posture is the well-known headstand posture and perhaps second only to the Padma-asana or lotus posture, is widely identified with the practice of Yoga.
Performing Instructions
- Sit in a kneeling position with the buttocks resting on the heels of the feet.
- Lean forward and place the forearms on the floor in front while keeping the elbows about shoulder distance apart. Interlock the fingers of both hands.
- Place the top of the head flat on the floor with the back of the head pressed against the inside of the interlocked fingers.
- Placing the tips of the toes firmly on the floor while lifting the heels, raise the knees off the floor.
- Hold for the duration of the held inhaled breath. When you can’t hold the breath comfortable any longer, slowly exhale and return the back to the floor, slide the legs out straight returning to the shava-asana.
Comments:
The siddha-asana is complicated to describe but is actually one of the simpler sitting postures. It requires less flexibility of the legs than the padma-asana yet it facilitates relaxation, concentration and ultimately, meditation.
Siddha-asana helps to establish an equilibrium throughout the body/mind. It will also help stretch the legs and pelvic area to the point where the padma-asana can be held effortlessly. Either posture, by creating a firm foundation with the legs locked in a crossed position and the spine held straight and motionless, awakens the attention and helps cultivate concentration. When concentration is highly focused and undistracted, meditation follows.
Duration/Repetitions:
Hold the sirsha-asana for 15-30 seconds when you first attempt it and increase the duration gradually over a period of a few weeks. As you skill increases you should hold it for as long as you feel comfortable.
Cautions/Restrictions:
If you are new to Yoga we recommend that you find a qualified instructor to teach you this posture and monitor you performance. If you attempting this alone position yourself in front of a wall as mentioned above.
If you are suffering from high or low blood pressure you should not attempt this posture.
The sirsha-asana should not be performed by woman who are menstruating, as is the case with all inverted postures (where the legs are raise over the head).
Variations:
There are several variations to the sirsha-asana that you can try when you are comfortable with the standard variation. First try spreading your legs wide apart, carefully separating them very slowly, while maintaining your balance, until they are as far apart as is comfortable. Bring your legs together before returning from the posture. Next, you can try placing the soles of your feet together while steadily holding the pose.