by Neetu | Jun 23, 2020 | Fitness Activity
Skill: Basic
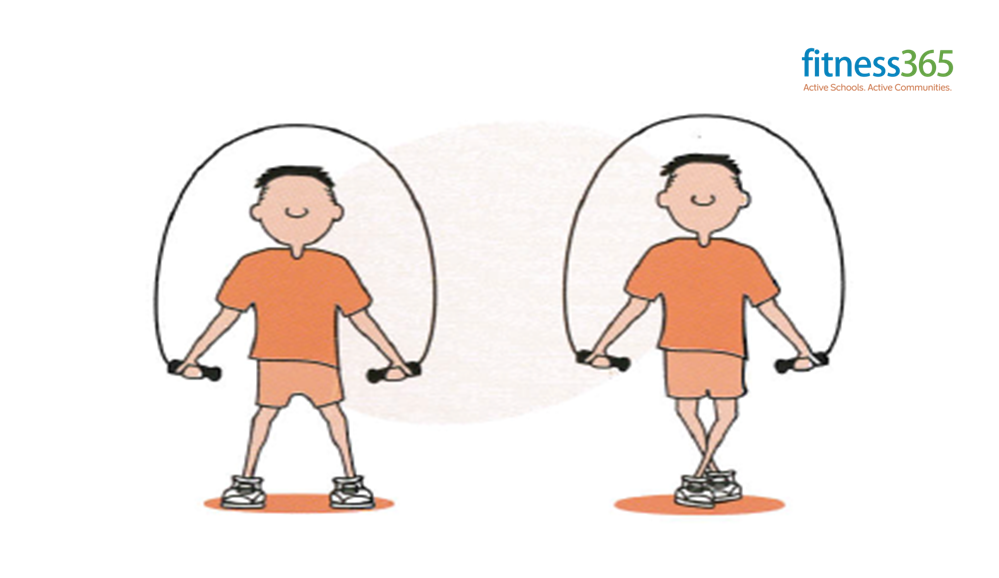
Equipment Required
Basic Short Skipping Rope – One per person
Activity Description
- Jump with feet shoulder-width apart (as with Jumping Jacks)
- Cross the feet one way
- Cross the feet another way
- Repeat
Progression
EASY: Practice the footwork without a rope
HARD: Try the skill whilst skipping backward
CHALLENGE: How many can you do in a row?
Can you put three different skills together into a sequence

by Santosh | Jun 22, 2020 | Soccer, Sports
LEARNING OUTCOME
To improve attacking and defensive heading techniques
TEACHING CUES
- Timing of the header
- Direction of the header
- Communication between the player and the server
- Use the forehead, not the top of the head
- Players to jump for the ball to take it earlier
- Player to attack the ball for more power
ACTIVITY SET-UP AND PROCEDURE
EQUIPMENT:
Marked area appropriate size for age, balls and cones
SET-UP:
ACTIVITY PROCEDURES:
- Players set up as shown in the diagram.
- 3 players act as servers for 1 working player.
- The 1st server throws the ball and the working player has to make a decision on how to deal with it depending on the flight, height and speed of the ball.
- They can either head downwards through gates 3, defensively towards gates 2 or long and high defensively towards gate 1
- After 3 attempts rotate working player.
Progressions:
- Increase / decrease the distance between players, servers and the coned gates
- Working player to call for the ball
- Servers throw in a random order
- Servers to have 3 balls each so working player has 9 attempts before changing
COOL DOWN/ CLOSURE
Review Skill/Activity, stretching, and questions.

by Santosh | Jun 22, 2020 | Soccer, Sports
LEARNING OUTCOME
To improve control and 1st touch
TEACHING CUES
- Quality of 1st touch / soft boot
- Body shape / movement / Speed of play
- Player alert and on their toes
- Player to communicate at all times
ACTIVITY SET-UP AND PROCEDURE
EQUIPMENT:
Marked area, 6 cones, 2 passing hurdles, 5 balls for 2 players
SET-UP:
ACTIVITY PROCEDURES:
- In a square, have 1 working player and 1 player serving the balls.
- The aim of the drill is for the working player to come towards server and command a ball, the player must then dribble and pass the ball through 2 hurdles and then stop the ball in the opposite marked corner area.
- Continuous practice.
- Working player works with 5 balls then swaps with serving player.
Progressions:
- Working players to concentrate on the quality of 1st touch in the direction of the first hurdle
- Increase / decrease the size of the area
- Have a competition between the 2 players to see how long it takes them to transfer the balls across the area to the other corner
COOL DOWN/ CLOSURE
Review Skill/Activity, stretching, and questions.
by Neetu | Jun 19, 2020 | Fitness Activity
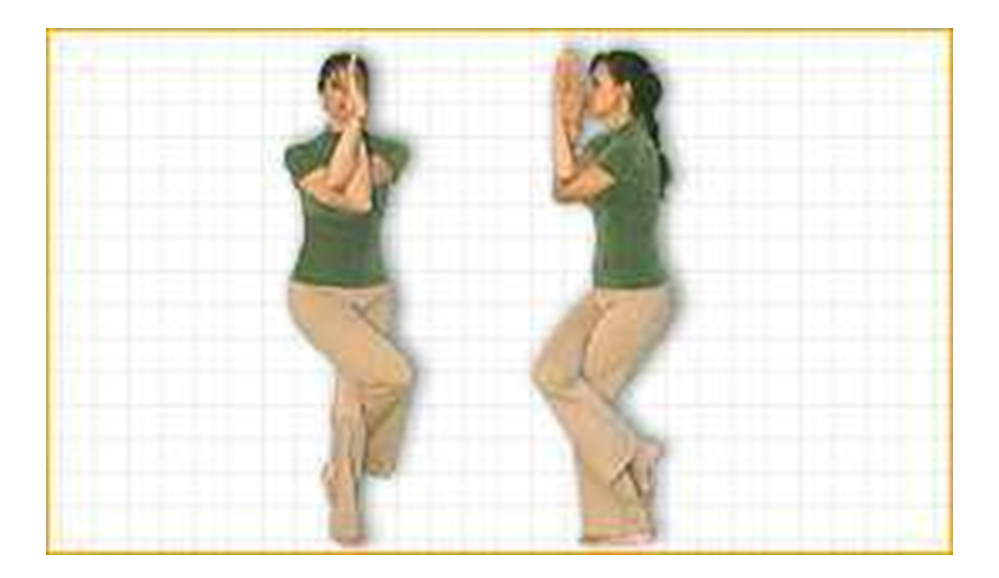
Posture: Garuda-asana – The Eagle Pose
(Pronunciation: ga-roo-dah-sa-na)
Description:
The Sanskrit word garuda means eagle. In Hindu mythology, Garuda is known as the king of birds. He transports the God Vishnu (shown with a bow and arrow in the illustration to the left) and is said to be eager to help humanity fight against daemons.
Performing Instructions
- Lie flat on the back in the shava-asana (corpse pose).
- Stand with the feet together and the arms by your sides (see the tad-asana).
- Draw the left foot upward bending the knee and wrap the left foot around your right leg as you rest the back of your left thigh on the right thigh.
- Cross your arms at the elbows, left over right.
- Join the palms of your hands together keeping the fingers pointed upward.
- Inhale and hold the posture for the duration of the inhaled breath.
- Exhale and return to the tada-asana. Repeat the posture on the opposite side, wrapping the right leg over the left and the right arm over left.
Comments:
The Garuda-asana will strengthen the legs, knees, and ankles. It stretches and tones muscles of the leg and can help relieve cramps of the legs.
Duration/Repetitions
Hold the Hala-asana for as long as you are comfortable. 20-30 seconds is fine for early attempts, increase the time gradually as you become more comfortable. You can also try holding the posture for as long as you can hold the inhaled breath. Repeat 2 or 3 times on each leg.

by Neetu | Jun 19, 2020 | Fitness Activity
Posture: Pose – The One-legged
(Pronunciation: eka-pod-ah-sa-na)
Description:
The Sanskrit word Eka means one and pada means foot making this the one-foot, or more commonly, one-legged pose.
Performing Instructions
- Stand with the feet together and the arms by your sides (see the tad-asana).
- Focus the eyes straight ahead on a spot midway between waist and eye level and remain focused there throughout this asana. (standing about five feet from a wall would be helpful).
- Inhale and extend the arms directly in front, parallel with the floor with thumbs touching.
- Exhale and raise the right knee bending the leg at a 90-degree angle, pause for a moment then extend the leg straight out in front pointing the toes forward.
- Pause for a moment then swing the leg back while bending forward at the waist.
- Breath slowly through the nostrils and make sure the arms, torso, and legs are parallel with the floor.
- Hold the posture for at least 30 seconds and then return slowly to a standing position.
Comments:
The ekapada-asana tones and strengthens leg muscles improve the sense of balance and helps sharpen concentration.
The ekpada requires that you become aware of your body/mind as a whole. As you practice this posture turn the attention away from distractions of the mind and center it on full body-awareness. Continual effort in the ekpada-asana in this way will help cultivate concentration.
The “closed eyes” variation (see below) intensifies the effect of the posture. Instead of relying on a fixed point of vision as an “anchor”, the practitioner will cultivate inner stability. The ekpada-asana also gives strength to the hips and lower back.
Duration/Repetitions
This posture should be held for a minimum of 30 seconds and can be extended to up to several minutes. Repeat at least twice on each foot.
Variations
When you can remain in the ekpada effortlessly for at least 30 seconds without wavering or losing balance, try doing it with the eyes closed. This variation makes the posture quite challenging but it increases the benefits as described above.