by Neetu | Jun 16, 2020 | Fitness Activity
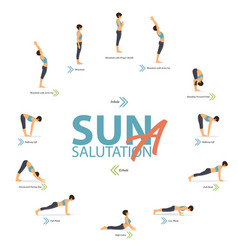
Posture: Surya-namaskar – Sun Salutation
(Pronunciation: soor-yee-ah-nahma-skar)
Description:
The Sanskrit word Surya means sun. Namaskar is the Hindi word for Namaste, from the root nam, to bow. Namaskar means salutation, salute, greeting, or praise.
STEP ONE:
Stand facing the direction of the sun with both feet touching. Bring the hands together, palm to- palm, at the heart.
STEP TWO:
Stand facing the direction of the sun with both feet touching. Bring the hands together, palm-to-palm, at the heart. Inhale and raise the arms upward. Slowly bend backward, stretching arms above the head.
STEP THREE:
Exhale slowly bending forward, touching the earth with respect until the hands are in line with the feet, head touching knees.
STEP FOUR:
Inhale and move the right leg back away from the body in a wide backward step. Keep the hands and feet firmly on the ground, with the left foot between the hands. Raise the head.
STEP FIVE:
While exhaling, bring the left foot together with the right. Keep arms straight, raise the hips, and align the head with the arms, forming an upward arch.
STEP SIX:
Exhale and lower the body to the floor until the feet, knees, hands, chest, and forehead are touching the ground.
STEP SEVEN:
Inhale and slowly raise the head and bend backward as much as possible, bending the spine to the maximum (as in the naga-asana).
STEP EIGHT:
While exhaling, bring the left foot together with the right. Keep arms straight, raise the hips, and align the head with the arms, forming an upward arch.
STEP NINE:
Inhale and move the right leg back away from the body in a wide backward step. Keep the hands and feet firmly on the ground, with the left foot between the hands. Raise the head.
STEP TEN:
Exhale slowly bending forward, touching the earth with respect until the hands are in line with the feet, head touching knees.
STEP ELEVEN:
Inhale and raise the arms upward. Slowly bend backward, stretching arms above the head.
STEP TWELVE:
Stand facing the direction of the sun with both feet touching. Bring the hands together, palm-to-palm, at the heart.
by Santosh | Jun 11, 2020 | Fitness Activity
Movement skills/concepts
Balancing using equipment, body and space awareness.
Set-up
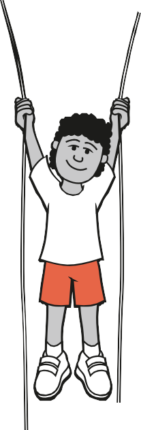
Hanging ropes with mats underneath.
Activity
On a hanging rope, children explore ways of balancing in an upright position.
Can you hang while …?
- supporting your weight with your hands
- supporting your weight with your hands and legs
- creating some basic shapes (e.g. wide, narrow, curled and twisted with your free body parts)
- creating symmetrical and asymmetrical shapes
Can you see …
- tight muscles
- tight grip on the rope
You could ask …
What do you need to do with your body to hold your position on the rope?
Variations
Inverted balance: If children have sufficient upper arm/shoulder strength, try an inverted balance on the hanging rope.
COOL DOWN/ CLOSURE
Review Skill/Activity, stretching, and questions.
by Santosh | Jun 10, 2020 | Fitness Activity
Movement skills/concepts
Cooperative balances, counterbalance, space and body awareness, and relationships (with others).
Set-up
Mats scattered in a defined area with an even surface.
Children in pairs, matched for height and weight, and with one mat per pair.
Activity
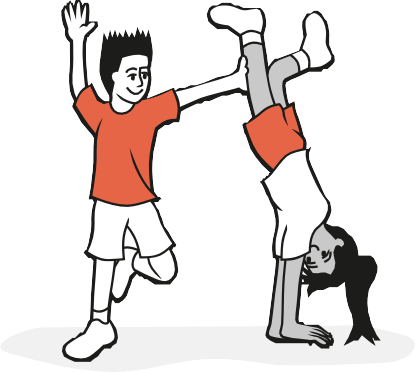
With your partner, children create a balance that has one wide and one narrow shape. Partners need to work together to partially support each other’s weight.
Children create different balances with their partner where they are partially supporting each other’s weight, then totally supporting each other’s weight.
Create a balance where one partner performs an inverted balance.
Can you see …?
- wide base of support
- extending body parts to counterbalance
- tight muscles
You could ask …
How can you safely support each other’s weight?
COOL DOWN/ CLOSURE
Review Skill/Activity, stretching, and questions.
by Santosh | Jun 10, 2020 | Fitness Activity
Movement skills/concepts
Dynamic and static balance, space awareness and relationships (with others and equipment).
Set-up
Beams/benches, mats, wobble boards, stilts, Swiss balls, box tops.
Small groups of no more than four, starting at different points of a circuit.
Activity
Children practise the following activities in the circuit.
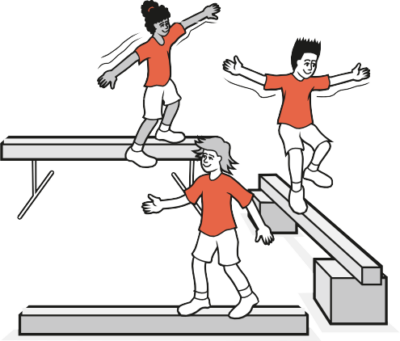
Beam/bench station: Have three beams/benches at different heights. Children travel along the beam/bench using different locomotor skills (leaps, jumps, walking forwards, backwards, sideways). Then create a sequence (e.g. walk to the end, turn, scale balance, walk to the centre, do a cat leap, walk to the end, do a jump, quarter turn to land).
Balance on less stable objects: Have a wobble board (different heights and bases), stilts and balance (Swiss) ball. Children experiment with different ways of balancing on apparatus, using different body parts (e.g. standing, sitting, kneeling). Can you balance on the apparatus with your eyes closed?
Stationary balances on equipment: Have a selection of box tops. Children create a series of balances, without leaving the surface of the box, transferring from one balance to the next. Then create a sequence of balances on the box that includes: an approach (e.g. run, walk) to the box; a transfer (e.g. jump, step) onto the box; a series of balances on the box; and a dismount (e.g. straddle to land) from the box.
Inverted balances on ground: Try a cartwheel on the ground, on a line (it is like a handstand but sideways). Once their legs are in the air, children bring them together and twist the body so that they land to the left and right – sometimes this is called a round-off. Try a cartwheel with only one hand on the ground.
A floor routine: Have a mat area of approximately 6–10 metres square, space permitting. Children create a sequence that combines stationary balances and travelling movements (e.g. running, galloping, skipping). Include at least three balances, each with a different base of support; a minimum of three travels, with a change in direction and level; and one inverted balance. Have a beginning and an end shape.
Can you see …?
- tight muscles
- wide base of support
- slow control when engaging and disengaging
- arms extended for balance (counterbalance)
You could ask …
How can you safely control engaging and disengaging from a stationary balance?
COOL DOWN/ CLOSURE
Review Skill/Activity, stretching, and questions.

by Santosh | Jun 10, 2020 | Fitness Activity
Movement skills/concepts
Cooperative balances, counterbalance, space and body awareness, and relationships (with others).
Set-up
An area with an even surface. Groups of five or seven.
Activity
One child starts off the activity by selecting a balance with a wide base of support. In turn, each other child adds to the statue by slowly making another shape (wide/ narrow/curled/twisted) touching the first statue with one body part.
Once the group balance statue is complete, on a signal each child (except the first one) moves slowly away from the original single-child statue, using a locomotor or turning action.
On a signal, each child moves slowly back into the group statue, with well-defined shapes, and holds their balance.
On a signal, each child moves slowly away again, forming an individual statue by themselves with a base of support and a shape that is different from those used for the group statue.
Can you see …?
- tight muscles
- keeping still – like a statue
- smooth, slow movement
- counterbalance
You could ask …
What do you need to do to counterbalance?
Variations
Choose a theme and add a movement: Create the shape of an object and carry out the movements of that object (e.g. a washing machine).
COOL DOWN/ CLOSURE
Review Skill/Activity, stretching, and questions.